Built a Crypto Event Streamer using CCXT: RabbitMQ (Part 1)
DISCLAIMER!!! This is not a trading quant system and not a financial article!!! This is only my personal project for learning how the data streaming event works. Use with caution!
Introduction
Using a personal laptop and Docker via OrbStack, this stack ran and successfully inserted ~500,000 rows in 2 hours :)
Real-time data ingestion via event streaming is still a hot topic even today, although many companies have already adopted it — with different stacks and different volumes being processed.
The need to build a real-time event pipeline varies: it could be for a real-time dashboard, real-time ML inference, and so on. Every stack and vendor — both open source and paid enterprise — already supports this, such as Kafka and Flink. Unfortunately, both stacks are known to be quite resource-hungry, which makes them seem hard to practice on a local laptop (unless you have a high-end laptop with large resources); Flink and Kafka are also usually deployed on servers with heavy compute.
Both real-time and batch (the latter being of course far older and more mature) must still apply good governance. We certainly don't want to receive invalid data — such as missing values or empty columns — or we would just end up collecting garbage and burdening our resources. The running data flow is also important to observe, because we need to know where the data comes from, where and how it is processed, and where it ends up.
Using crypto data via the CCXT library in Python (which is free, of course), this project implements a real-time event streaming pipeline.
What
Prerequisites:
- Docker with
docker-compose - WSL2 if using Windows.
The data used comes only from Binance, via the ccxt Python library:
pip install ccxt
even though ccxt also provides data from other exchanges such as Kucoin, Bitget, and even Indodax.
The pairs used are only those with the largest current market cap, so their liquidity is also the highest. This is necessary so that the streamed data keeps flowing at all times (low liquidity means fewer transactions and, of course, less data): BTC/USDT, ETH/USDT, BNB/USDT, and SOL/USDT. However, on a local laptop (MacBook Pro M1 2020, 8GB RAM, 512GB SSD), the size for a 2-hour stream is still fine, at around 500k rows.
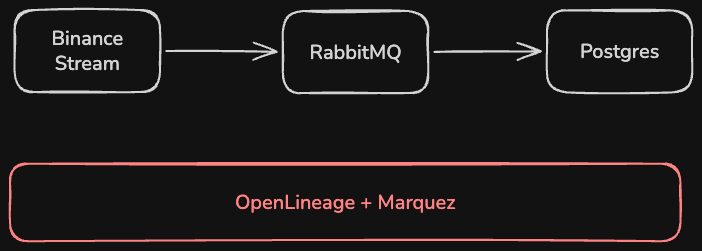
Therefore, the stacks to be used are:
- RabbitMQ for message queueing
- Postgres for data persistence
- Openlineage + Marquez for lineage and observability
To keep the load off the laptop, RabbitMQ is given only 256MB, Marquez 1024MB (previously set to 512MB but it hit a heap space error), and Postgres only 256MB.
Beyond the stacks, there are the producer and consumer, written in Python and run as Docker containers with a 512MB allocation, and Marquez web with only 128MB.
OpenLineage and Marquez are used to track data lineage, which means we can know where the data comes from, who processes it, and where it will be stored.
Methods
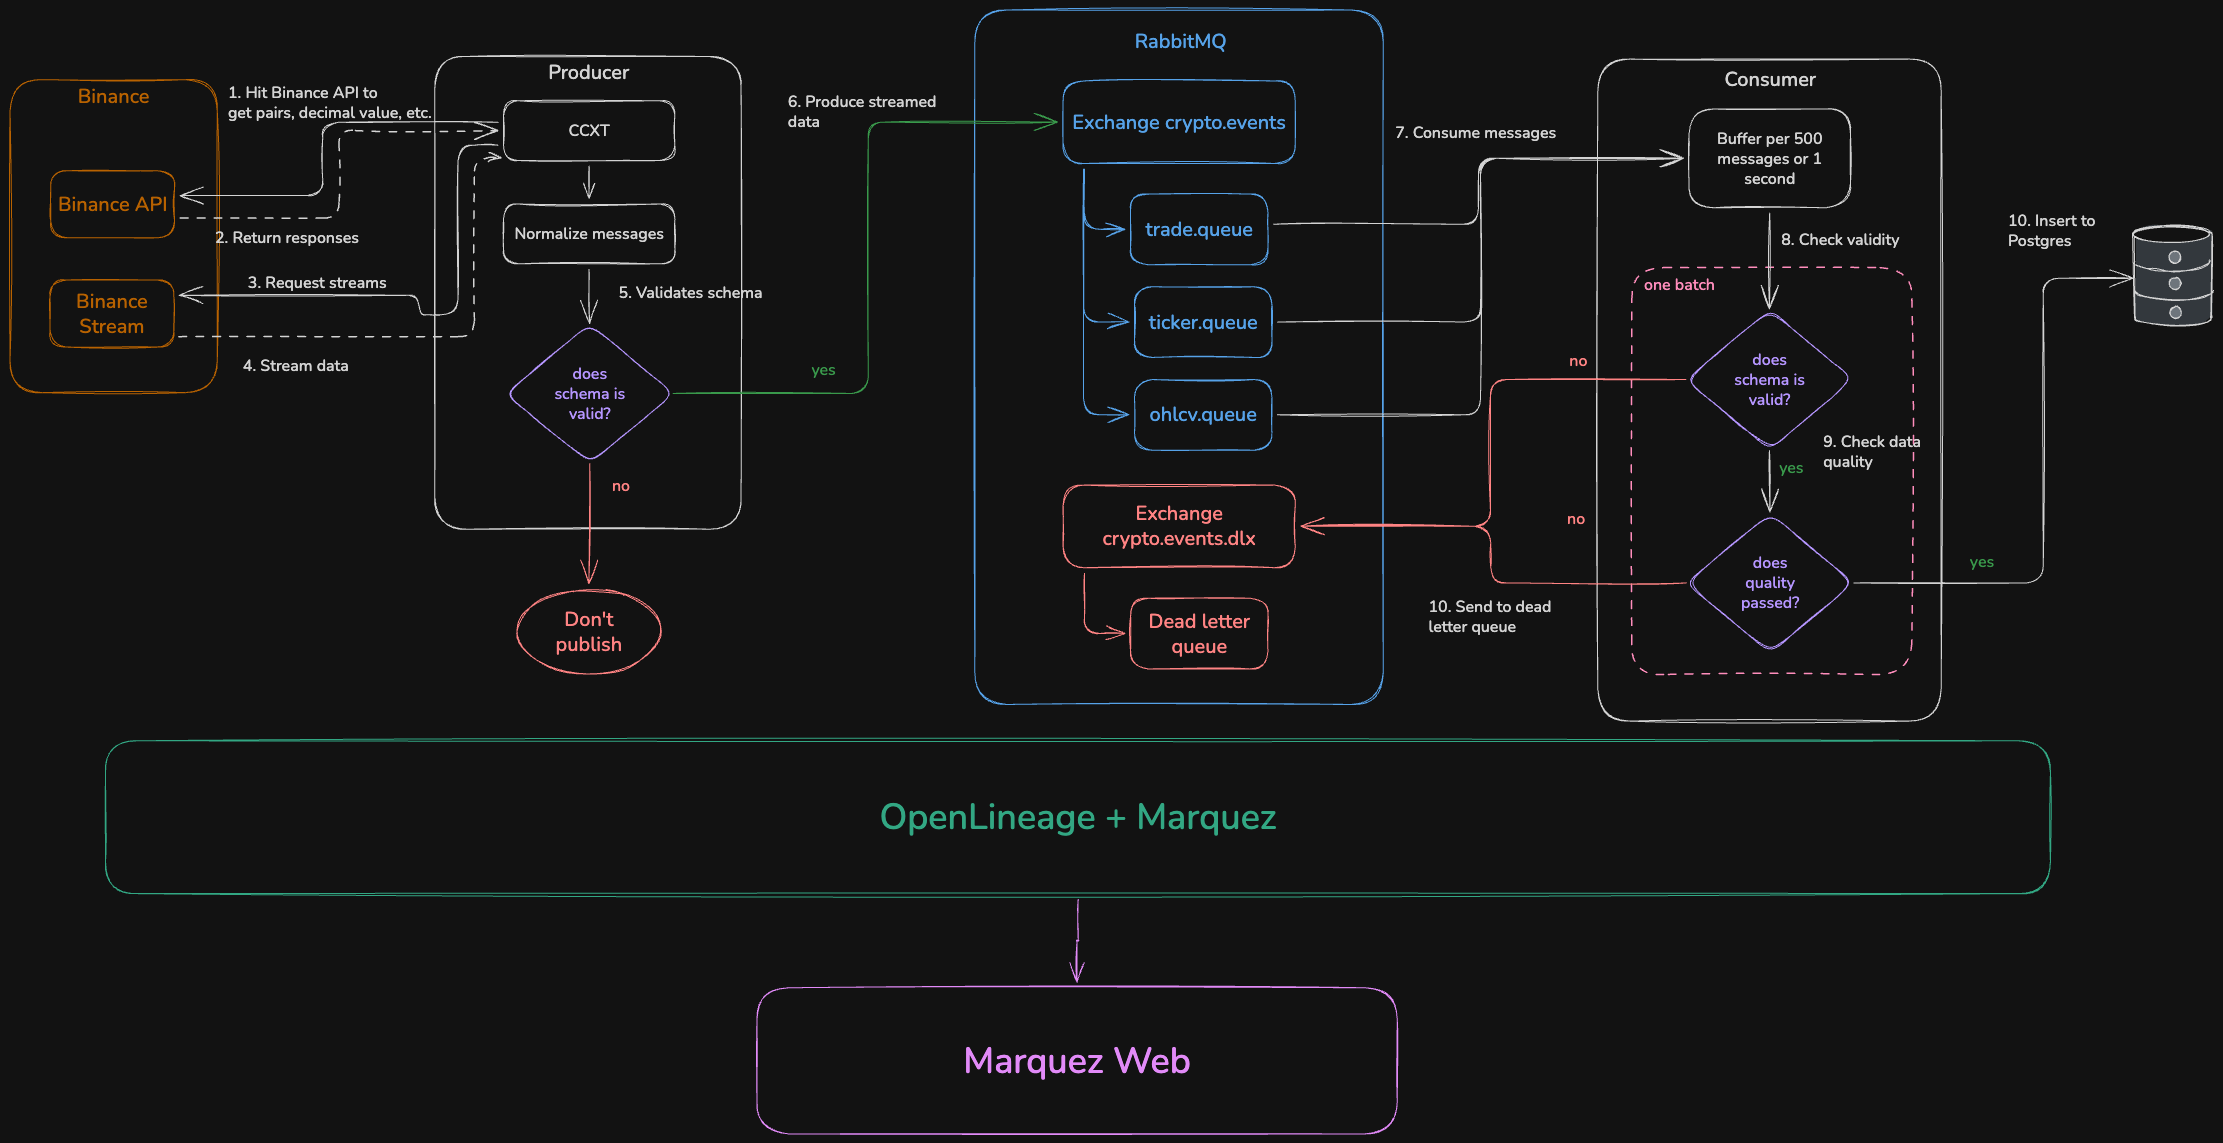
Based on the basic flow in the What section above, the detailed flow that can be built looks like this.
Looks complicated, right? But that's fine — I'll help explain it using the Extract-Transform-Load (ETL) approach.
Source / Extract
Data is fetched from Binance via ccxt, but using ccxt.pro, which has the streaming feature this project needs.
import ccxt.pro as ccxtpro
CCXT hits two Binance endpoints:
https://api.binance.com/api/v3/exchangeInfo
https://stream.binance.com
The Binance API is hit first, which is useful for getting information about the pairs that can be pulled as well as the parameters that can be passed to the Binance stream API — such as market type (futures, spot), interval (1 minute, 5 minute, and so on), and others. Without it, CCXT wouldn't know the parameters and information to supply up front before hitting the Binance Stream API.
// Payload sample of Binance API result
   {
     "timezone": "UTC",
     "serverTime": 1788631650000,
     "rateLimits": [
       { "rateLimitType": "REQUEST_WEIGHT", "interval": "MINUTE", "intervalNum": 1, "limit": 6000 },
       { "rateLimitType": "ORDERS", "interval": "SECOND", "intervalNum": 10, "limit": 100 },
       { "rateLimitType": "RAW_REQUESTS", "interval": "MINUTE", "intervalNum": 5, "limit": 61000 }
     ],
     "exchangeFilters": [],
     "symbols": [
       {
         "symbol": "BTCUSDT",
         "status": "TRADING",
         "baseAsset": "BTC",
         "quoteAsset": "USDT",
         "baseAssetPrecision": 8,
         "quotePrecision": 8,
         "orderTypes": ["LIMIT", "MARKET", "STOP_LOSS", "STOP_LOSS_LIMIT", "TAKE_PROFIT", ...],
         "filters": [
           { "filterType": "PRICE_FILTER", "minPrice": "0.01000000", "maxPrice": "1000000.00000000", "tickSize": "0.01000000" },
           { "filterType": "LOT_SIZE", "minQty": "0.00001000", "maxQty": "9000.00000000", "stepSize": "0.00001000" }
         ]
       },
       ...
     ]
   }
Next, CCXT makes a request to pull the stream from the Binance Stream API, and the stream runs continuously, non-stop.
The APIs that can be pulled are orderbook, trades, ticker, and Open High Low Close Volume (ohlcv); however, this project does not pull orderbook to save disk.
// watch_trades()
   [
     {
       "id": "4334170492",
       "timestamp": 1788631650947,
       "datetime": "2026-09-05T18:07:30.947Z",
       "symbol": "ETH/USDT",
       "side": "buy",
       "price": 2479.41,
       "amount": 0.004,
       "cost": 9.91764,
       "takerOrMaker": "taker",
       "fees": [],
       "info": {
         "e": "trade", "E": 1788631650947, "s": "ETHUSDT",
         "t": 4334170492, "p": "2479.41000000", "q": "0.00400000", "m": true
       }
     }
   ]
// watch_ticker()
  {
    "symbol": "SOL/USDT",
    "timestamp": 1788631652795,
    "datetime": "2026-09-05T18:07:32.795Z",
    "high": 104.37,
    "low": 101.26,
    "bid": 104.01,
    "ask": 104.02,
    "last": 104.02,
    "close": 104.02,
    "open": 101.56,
    "baseVolume": 1477581.93,
    "quoteVolume": 151598119.59559,
    "percentage": 2.42221346987003,
    "info": { "e": "24hrTicker", "s": "SOLUSDT", "p": "2.42221346987003", "c": "104.02", ... }
  }
// watch_ohlcv() for Binance in 1m interval
[
    [ 1788631620000, 80050.01, 80050.01, 80034.00, 80034.00, 0.96582 ]
  ]
Because only the data fields we need are processed, normalization is required, which will be explained in the Transform step below.
Transformation
Transformation here involves the following process:
consume data -> normalize -> schema validation
all of it happens in the producer logic — the program that sends messages (produces) to RabbitMQ via the aiopika library.
The consumed data is normalized so that it only contains the needed information. Here is an example of a ticker payload that has not been normalized.
// watch_ticker()
  {
    "symbol": "SOL/USDT",
    "timestamp": 1788631652795,
    "datetime": "2026-09-05T18:07:32.795Z",
    "high": 104.37,
    "low": 101.26,
    "bid": 104.01,
    "ask": 104.02,
    "last": 104.02,
    "close": null,
    "open": null,
    "baseVolume": 1477581.93,
    "quoteVolume": null,
    "percentage": 2.42221346987003,
    "info": { "e": "24hrTicker", "s": "SOLUSDT", "p": "2.42221346987003", "c": "104.02", ... }
  }
example schema for ticker.v1.json validation
{
  "$schema": "http://json-schema.org/draft-07/schema#",
  "$id": "ticker.v1",
  "x-table": "tickers",
  "title": "Ticker",
  "type": "object",
  "required": ["symbol", "timestamp", "last", "close"],
  "properties": {
    "symbol": {
      "type": "string",
      "enum": ["BTC/USDT", "ETH/USDT", "BNB/USDT", "SOL/USDT"]
    },
    "timestamp": { "type": "integer", "minimum": 0 },
    "last": { "type": "number", "exclusiveMinimum": 0 },
    "high": { "type": "number" },
    "low": { "type": "number" },
    "open": { "type": "number" },
    "close": { "type": "number" },
    "baseVolume": { "type": "number", "minimum": 0 },
    "quoteVolume": { "type": "number", "minimum": 0 },
    "percentage": { "type": "number" }
  },
  "additionalProperties": true
}
after normalization, it becomes like this.
   {
     "symbol": "SOL/USDT",
     "timestamp": 1788631652795,
     "last": 104.02,
     "high": 104.37,
     "low": 101.26,
     "baseVolume": 1477581.93,
     "percentage": 2.42
   }
Looks slimmer than the original payload, right? Then, null fields are not kept, and they will be validated in the next step. If a required field is null (in this case symbol, timestamp, last, and close), the payload is discarded. In that case, close is null, so it is discarded.
If it passes, it is forwarded to RabbitMQ with this exchange and queues:
--- Exchange crypto.events
    |--- ticker.queue
    |--- trade.queue
    |--- ohlcv.queue
Load
In this part, the consumer takes over. Unlike the producer, the consumer is the program that consumes the data. Data that has entered RabbitMQ is consumed by the consumer.
In the consumer, the tasks to be done are:
consume data -> schema validation -> quality checking -> insert/update to Postgres
so schema validation is done twice — once in the producer and once in the consumer. The difference is that invalid data is not deleted; instead, it is sent to a dead letter queue on the crypto.events.dlx exchange. This is done so we can inspect that data later.
--- Exchange crypto.events.dlx
    |--- crypto.events.dlq queue
   async def _flush(self, schema_id: str) -> None:
       batch, self._buffers[schema_id] = self._buffers[schema_id], []
       if not batch:
           return
       try:
           rejected = await self._handler(schema_id, batch)
       except Exception:
           for message in batch:
               await message.nack(requeue=True)
           raise
       for position, message in enumerate(batch):
           if position in rejected:
               await message.reject(requeue=False)  # -> pass to dead letter
           else:
               await message.ack()
Is it only data that fails schema validation that goes into the dead letter queue? Clearly not — there is also quality checking done using Great Expectations.
import great_expectations as gx
Quality checking is a crucial stage whose job is to determine whether data is valid. The validity checked in this project is:
-
Symbol: must be one of the four pairs: BTC/USDT, ETH/USDT, BNB/USDT, and SOL/USDT, and must not be
null; otherwise, it goes to the DLQ (Dead Letter Queue). -
Prices such as
price,amount,high,low,close,volumemust not be null or below 0; otherwise, it goes to the DLQ (Dead Letter Queue). -
timestampmust be above 0.timestampis currently still epoch-typed. Otherwise, it goes to the DLQ (Dead Letter Queue).
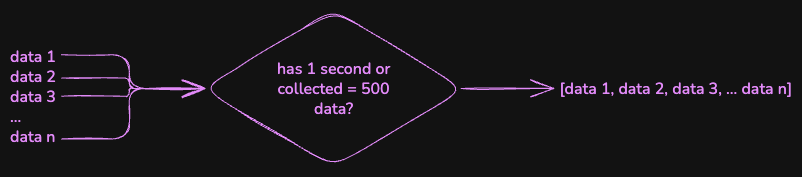
Validation is done by inspecting every *.v1.json file (such as ticker.v1.json). Unfortunately, validation with Great Expectations can only be done via mini-batch (collecting data before further processing), with the criteria that the collected data has reached 500 items or 1 second has passed. Once 1 second passes, the collected data is validated; or if it reaches 500 before 1 second, it is forwarded for validation.
After validation, the data is inserted into PostgreSQL with this mechanism:
ohlcvdata gets deduplication / upsert using thesymbol,timeframe,timestampcolumns.- The rest are inserted as-is.
- Every row is given an incremental integer ID.
The insert process uses the AsyncConnectionPool class from psycopg_pool
from psycopg_pool import AsyncConnectionPool
rather than a plain async connection, AsyncConnectionPool allows creating a pool for consuming the three datasets, so each dataset insert has its own connection to Postgres.
Observability
The entire flow is tracked as lineage using OpenLineage and can be monitored with Marquez. Facets are atomic metadata used to identify entities in the lineage, and there are three of them: Job, Run, and Dataset. See OpenLineage Docs for a more detailed explanation.
Facet usage in OpenLineage:
1. Job facets
| Facet key | OpenLineage class | Value / content |
|---|---|---|
jobType | JobTypeJobFacet | processingType=STREAMING, integration=PYTHON, jobType=STREAM |
2. Run facets
| Facet key | OpenLineage class | Value / content | When it appears |
|---|---|---|---|
errorMessage | ErrorMessageRunFacet | message (error text), programmingLanguage=PYTHON | on FAIL, and on a RUNNING heartbeat when there is a recoverable error |
tags | TagsRunFacet | one default tag: openlineage_client_version (source=OPENLINEAGE_CLIENT) | always, on every run |
3. Dataset facets
| Facet key | OpenLineage class | Value / content | Attached to |
|---|---|---|---|
schema | SchemaDatasetFacet | fields[] = {name, type} (from JSON Schema) | all datasets (input & output) |
dataQualityAssertions | DataQualityAssertionsDatasetFacet | assertions[] = {assertion, success, column} (from GE) | output datasets only |
outputStatistics | OutputStatisticsOutputDatasetFacet | rowCount (rows per window) | output dataset, in the outputFacets field |
Besides facets, there is also a namespace, a unique identifier that serves to group jobs and datasets. Here is how namespaces are used in this project:
| Namespace | Content | Dataset / Job |
|---|---|---|
binance_streams | Binance WebSocket feed (data source) | Dataset input: (binance_streams, trade), (binance_streams, ticker), (binance_streams, ohlcv) |
rabbitmq | RabbitMQ exchange crypto.events (queue between services) | Dataset: (rabbitmq, crypto.events.trade), (rabbitmq, crypto.events.ticker), (rabbitmq, crypto.events.ohlcv) |
postgres | PostgreSQL database (final destination) | Dataset output: (postgres, crypto.public.trades), (postgres, crypto.public.tickers), (postgres, crypto.public.ohlcv) |
crypto | Job namespace (not a dataset) | Job: producer.trade, producer.ticker, producer.ohlcv, consumer.trade, consumer.ticker, consumer.ohlcv |
Result
The codebase can be seen in the following repo: Github Repo.
After it runs successfully, Marquez can be opened and accessed via localhost:3000.
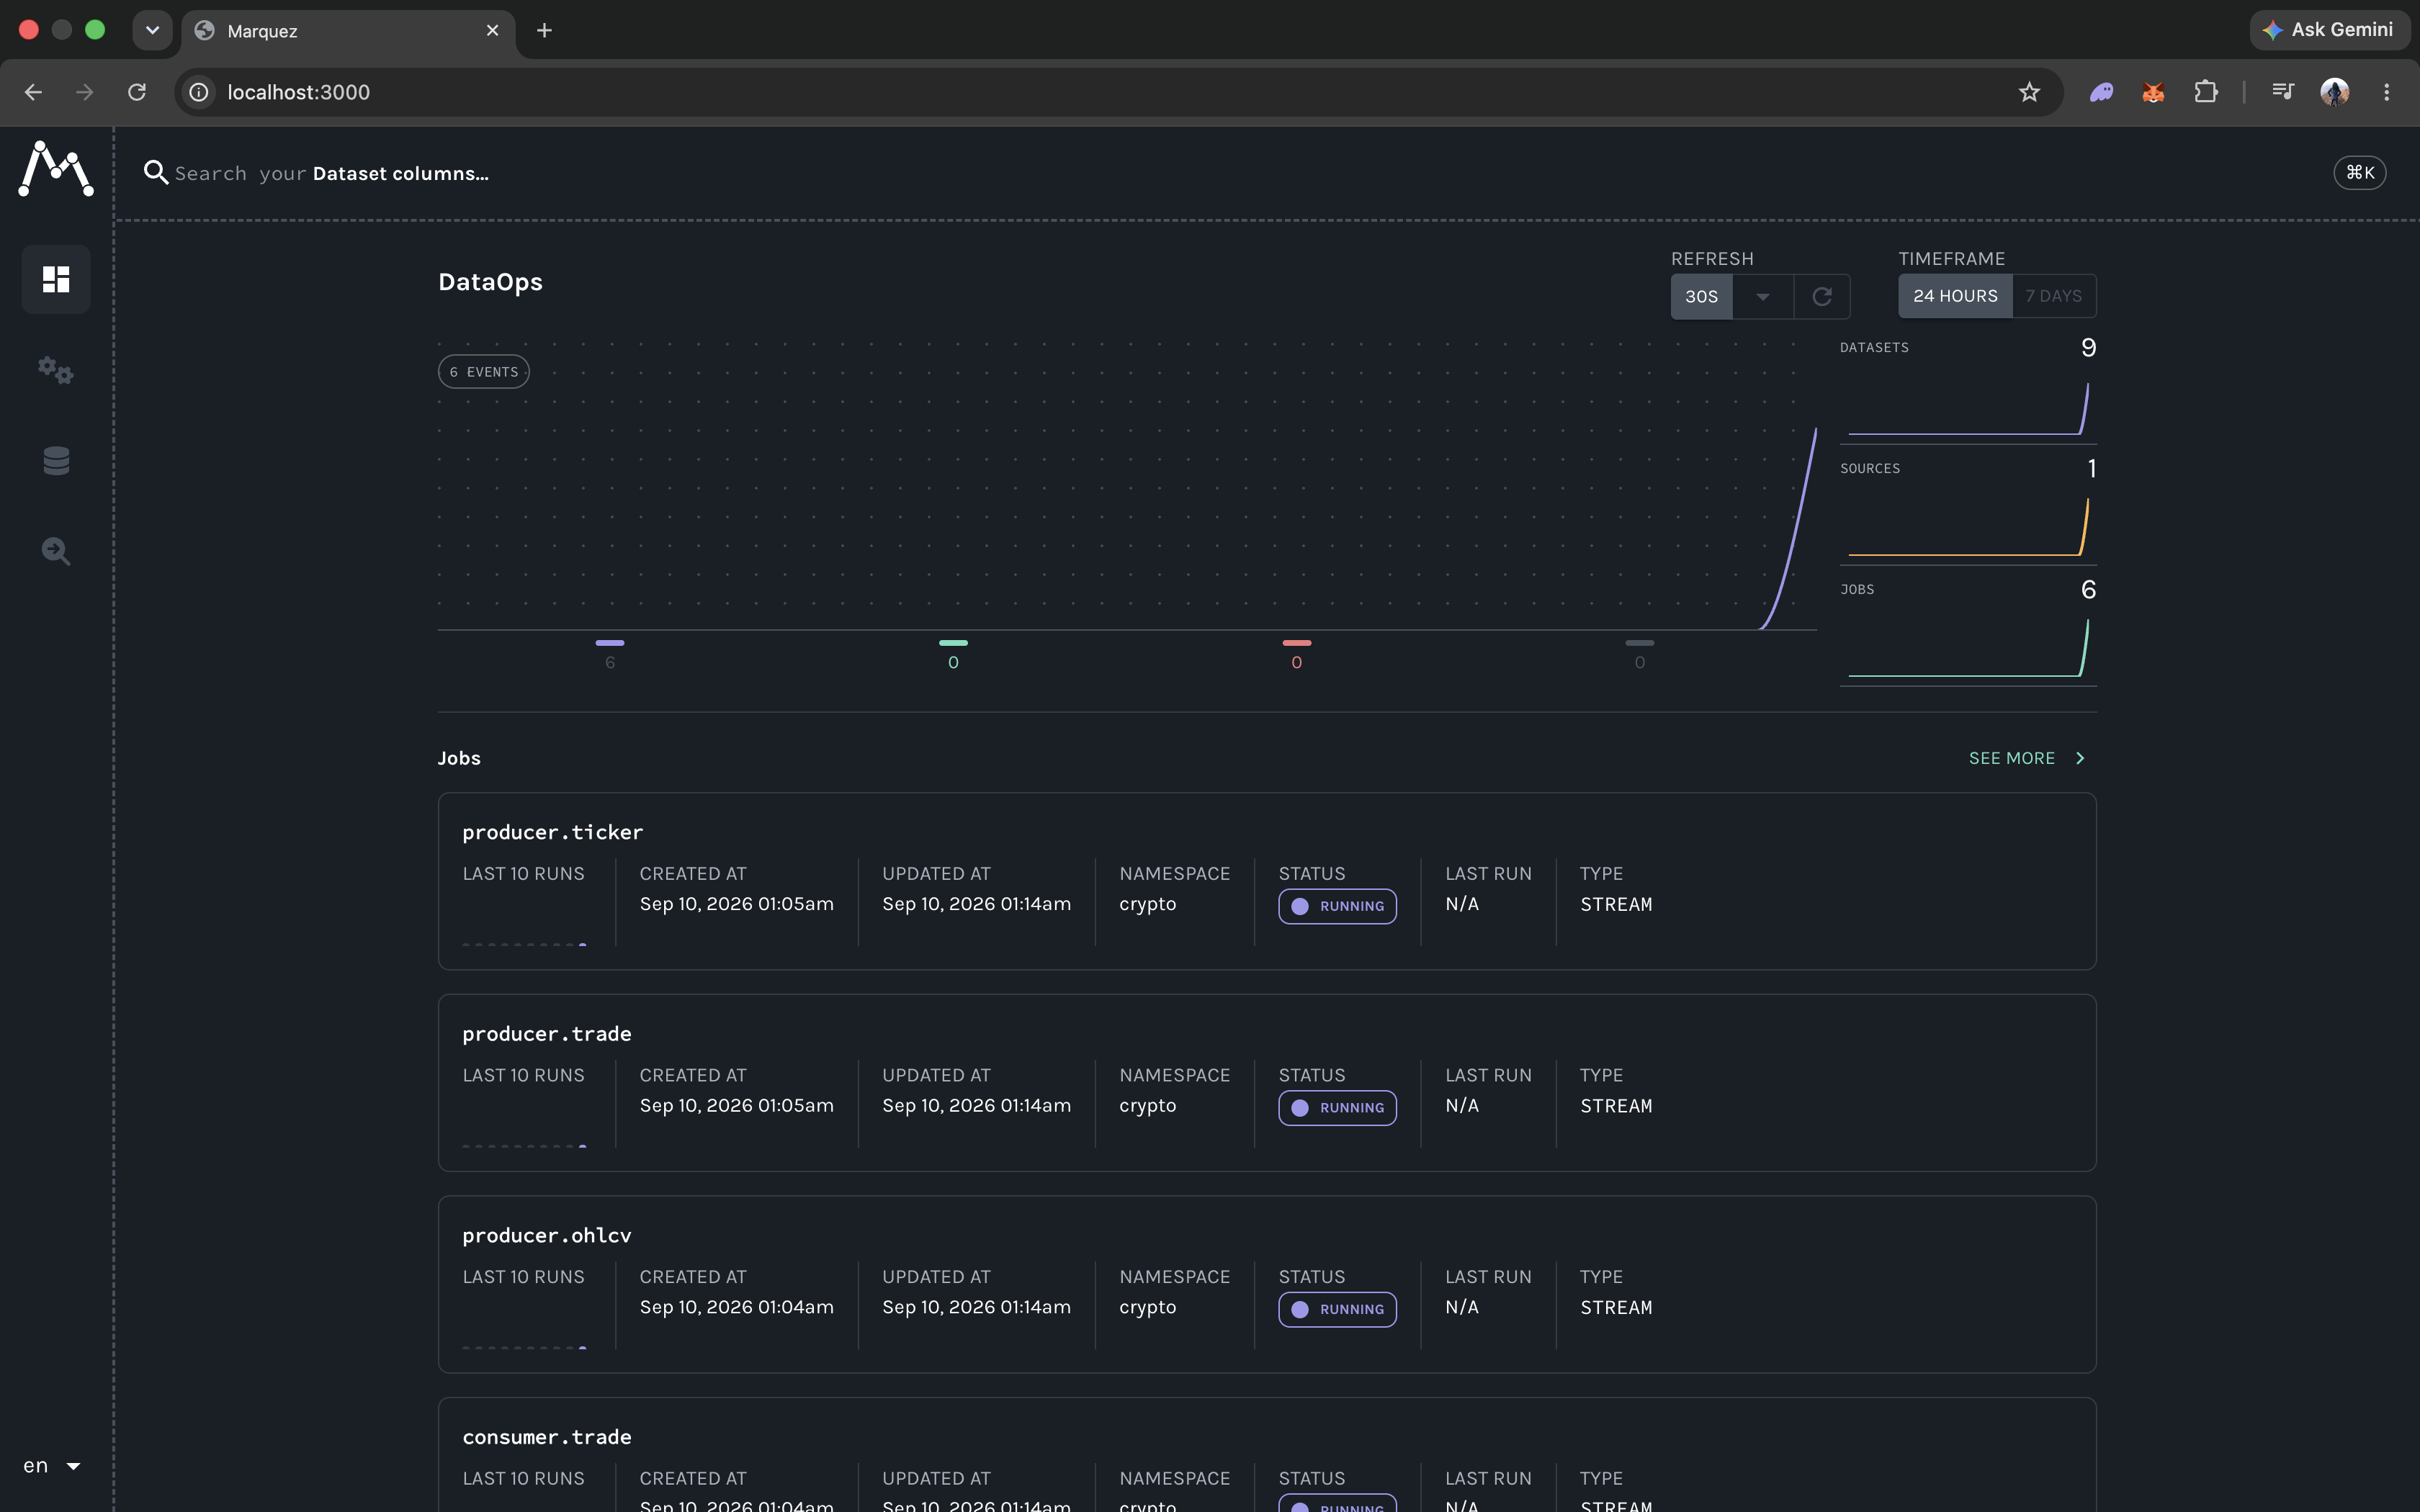
The DataOps chart still looks sparse because it has just been run. Lineage can also be viewed per stream; this is an example of the lineage for the ticker dataset running without errors.
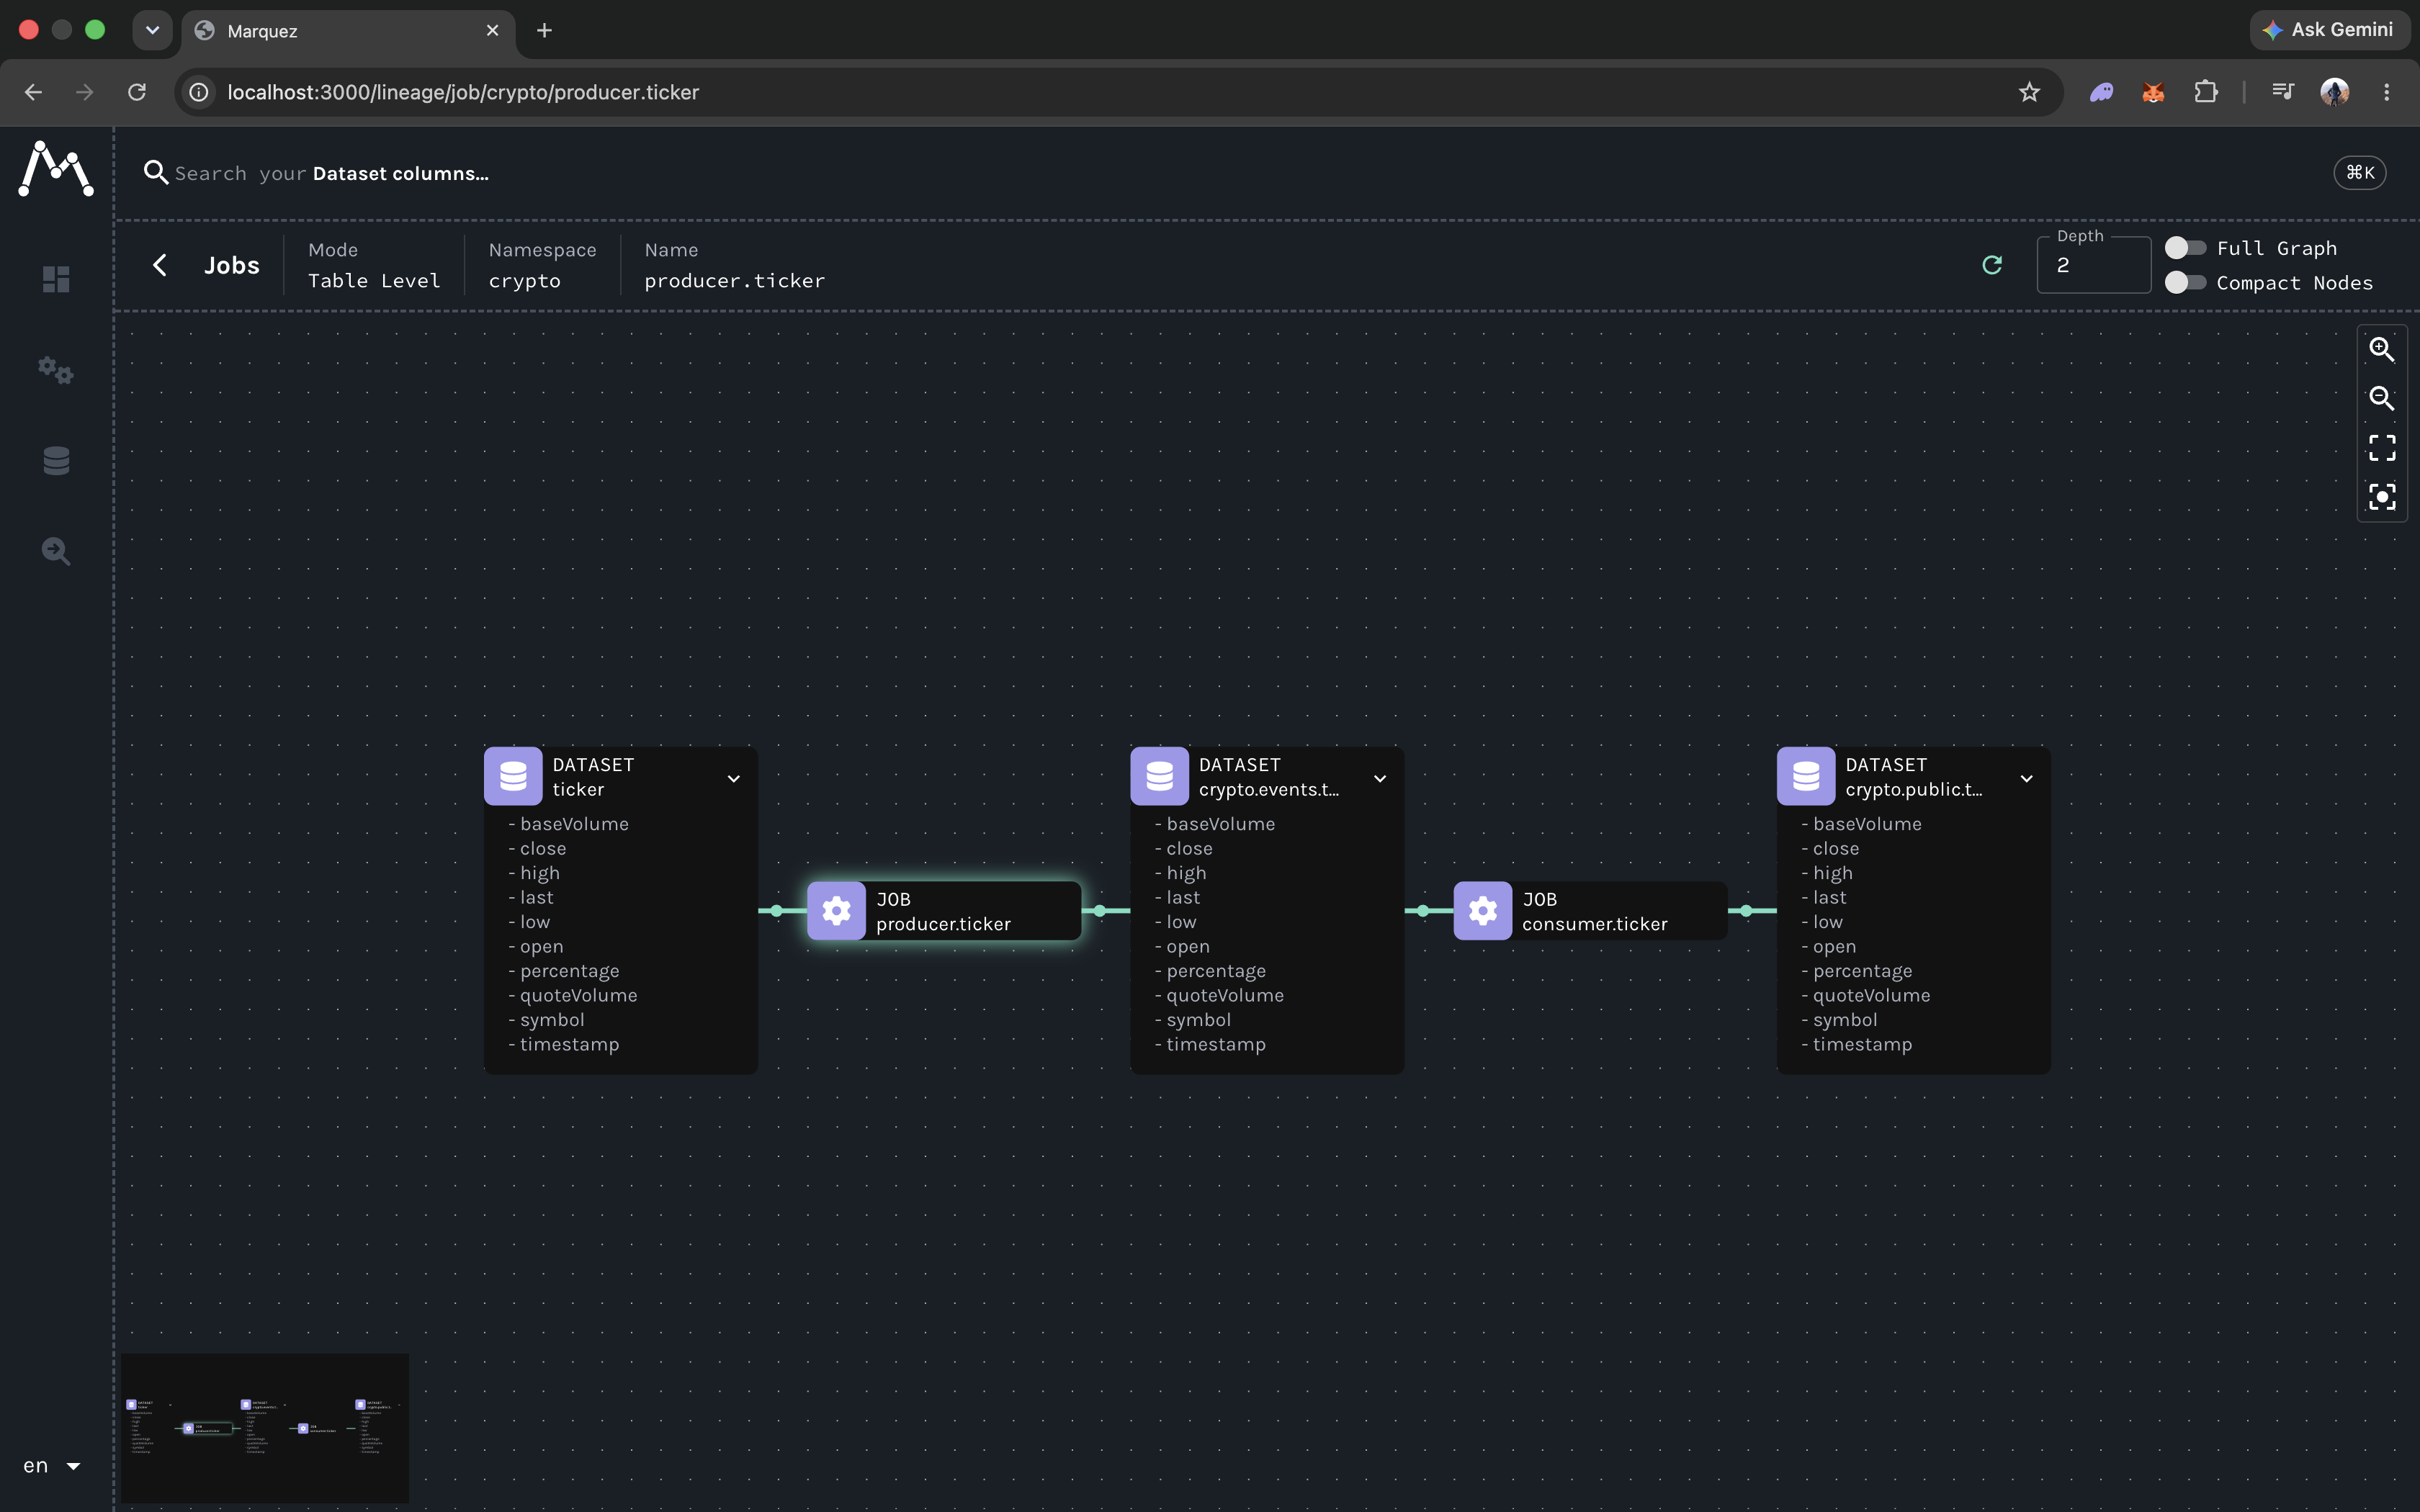
This is very helpful for observability because, as data engineers, we are expected to know the flow: where the data comes from, where it is processed, and where it ends up.
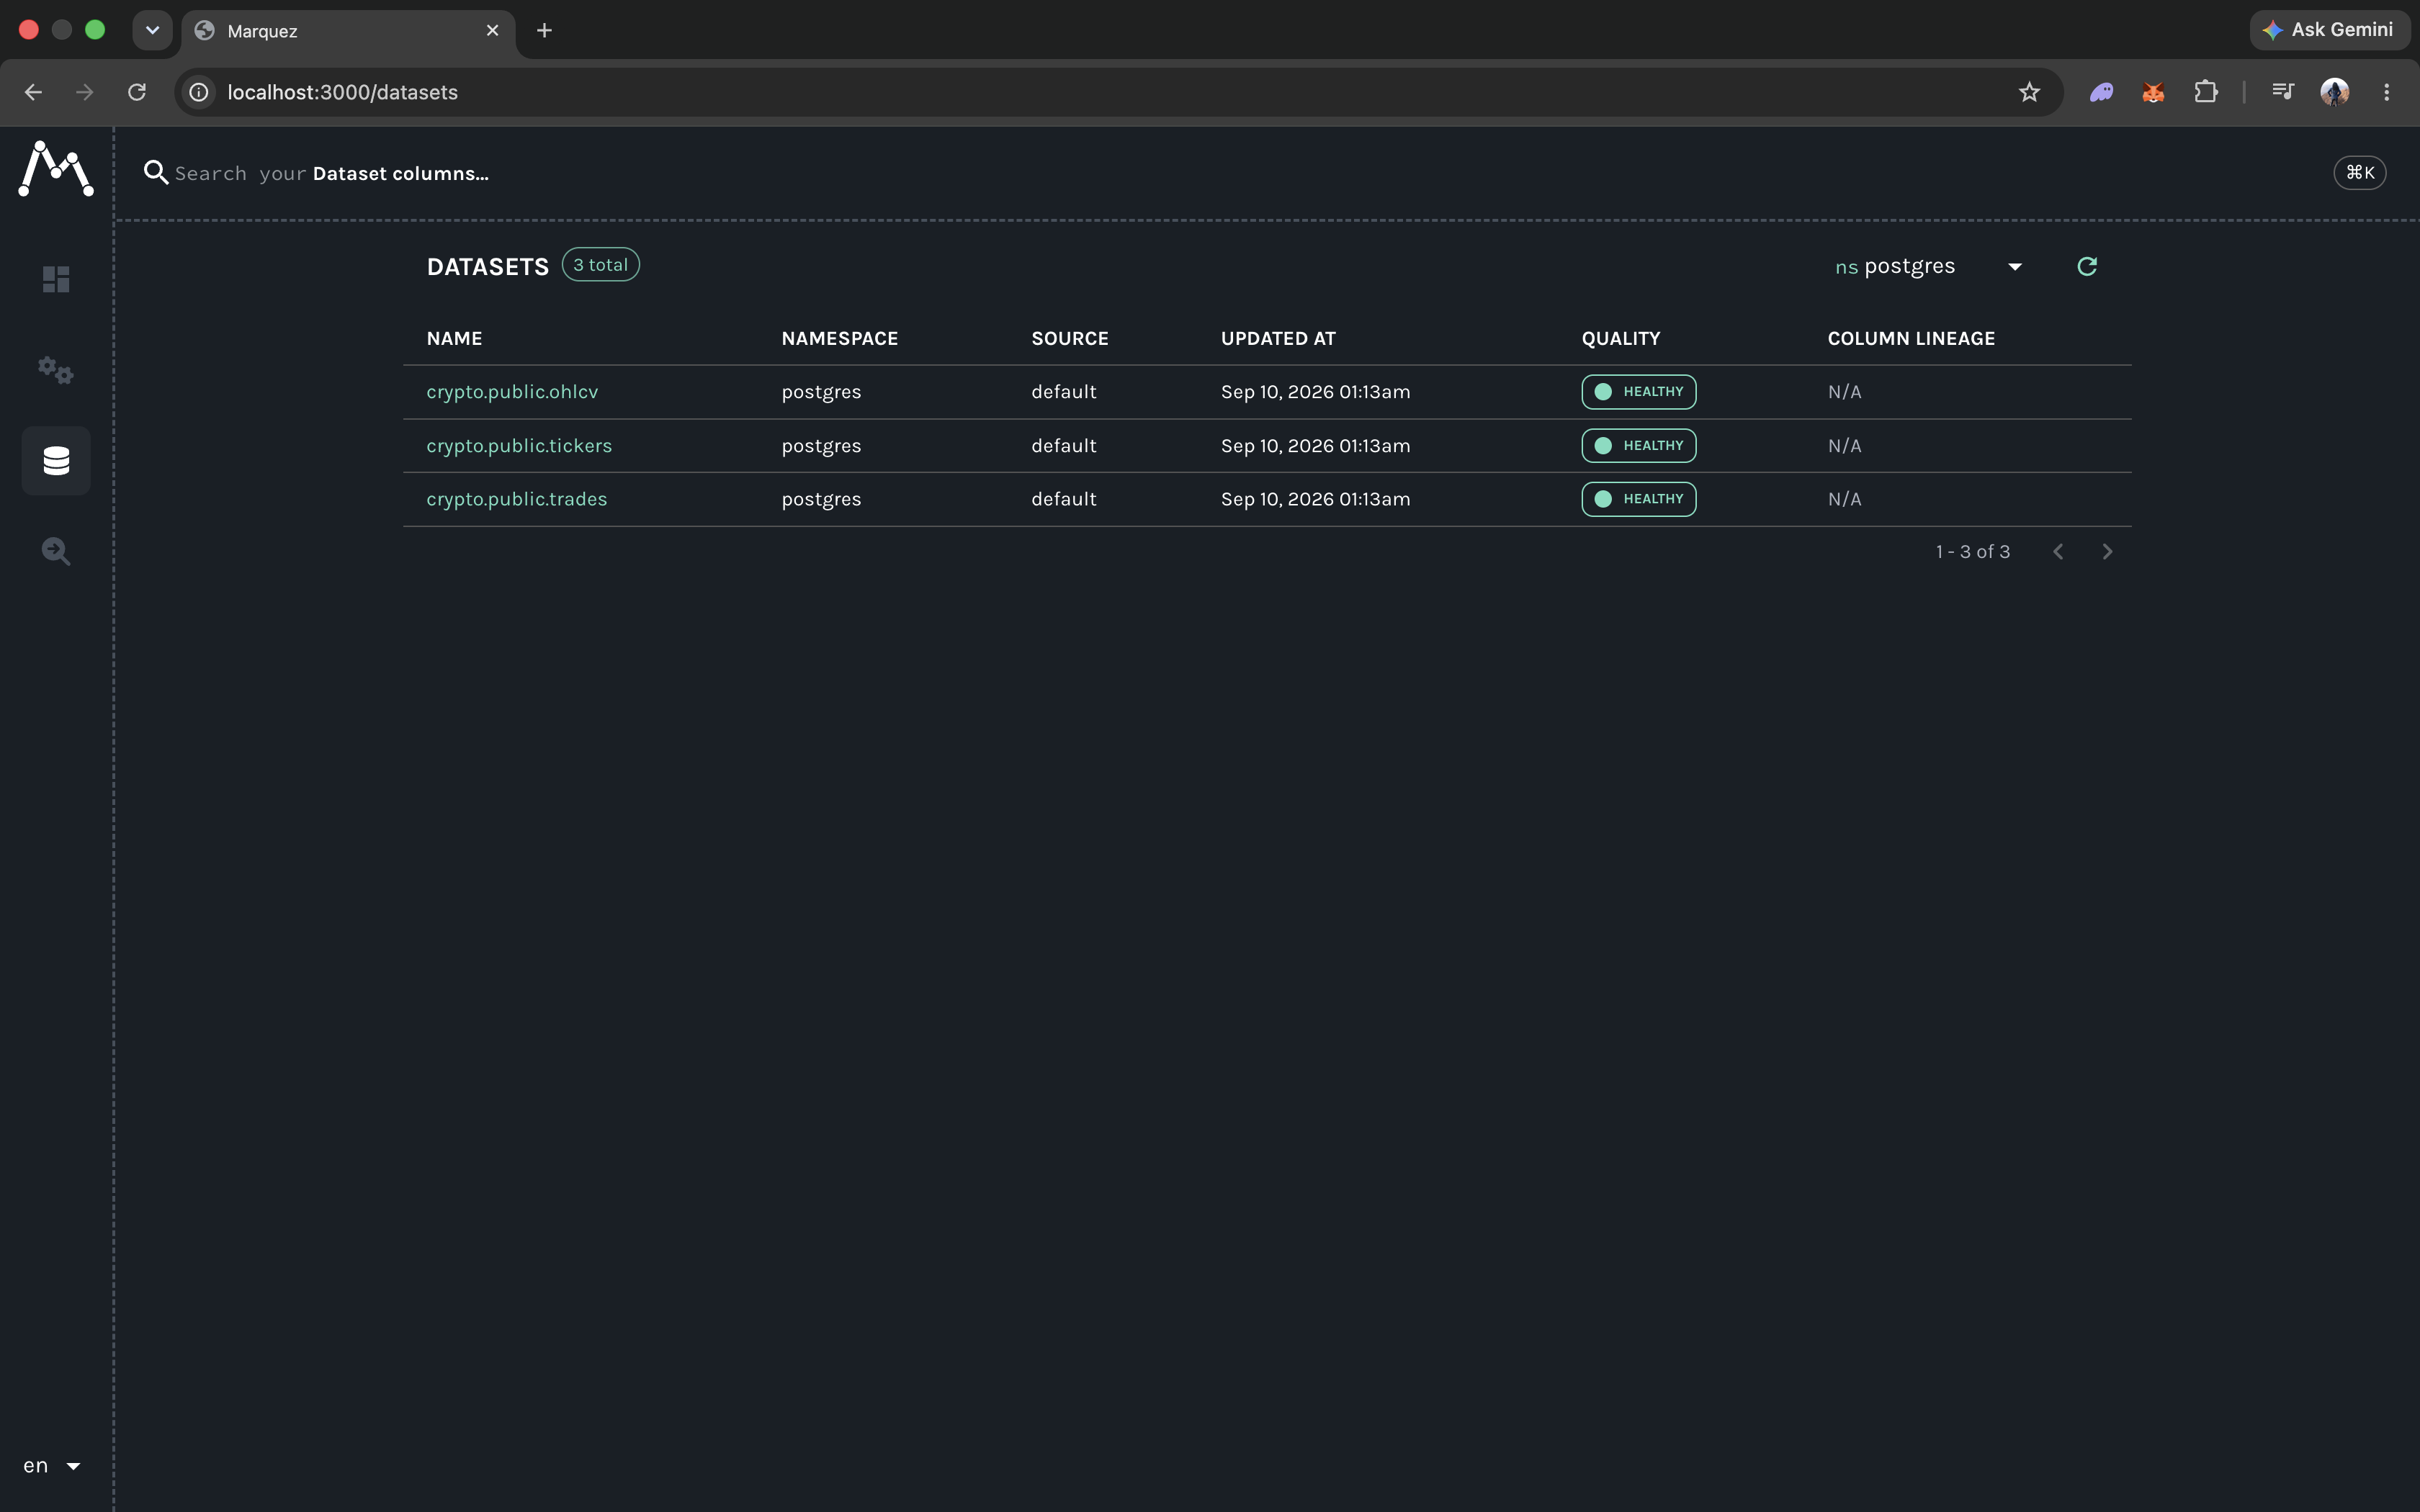
Now, the most important part: data. After the whole flow runs, the data can be viewed directly.
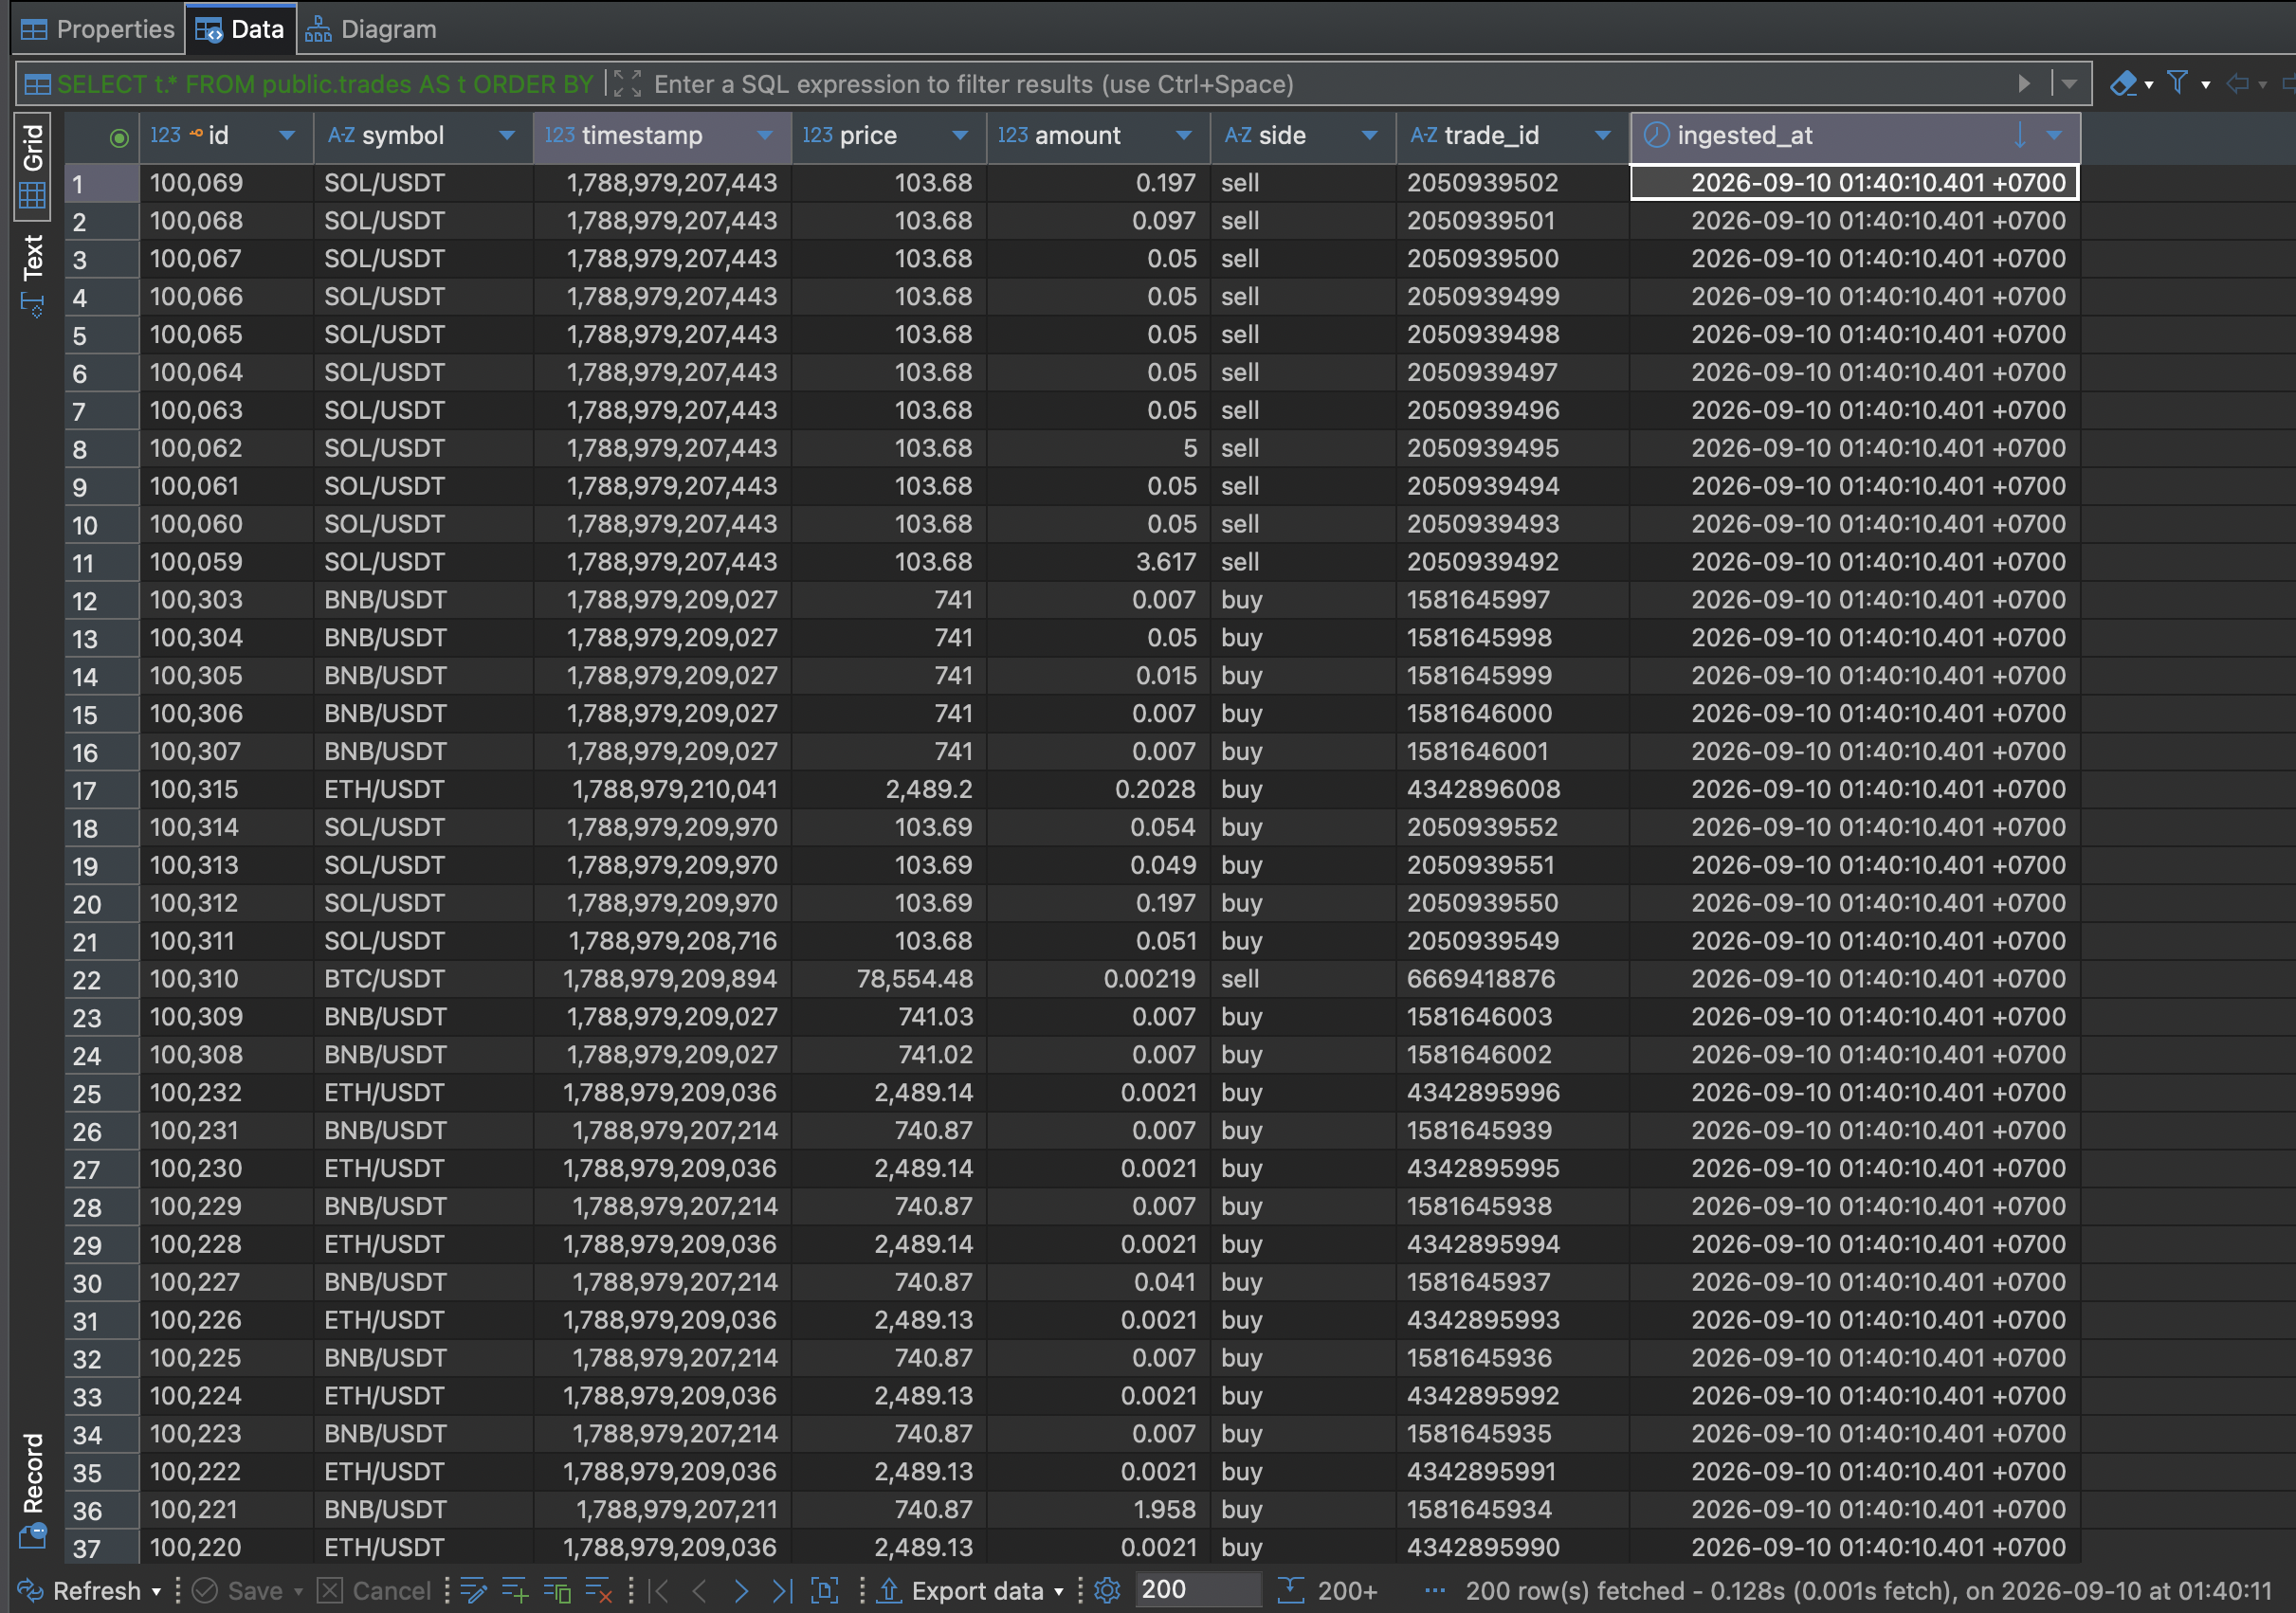
If the data appears, it means the development process for this pipeline has succeeded.
Notes
Because my network blocks the binance.com endpoints, I had to forward via my VM elsewhere, so there is an addition in docker-compose.yml:
  producer:
    build:
....
    extra_hosts:
          - "stream.binance.com:host-gateway"
          - "api.binance.com:host-gateway"
if your network does not block those two endpoints, extra_hosts can be turned off.
Conclusion
A few things that could be added:
- Convert epoch timestamp to a true timestamp type. This can be done so that data can be read by users without having to convert it again in Postgres.
- Adding the
orderbookdataset. - Testing with Kafka for persistent messages and multiple consumers.
- Retryable if the process dies.
This article will continue to part 2, which will cover Built a Crypto Event Streamer using CCXT: Kafka and Flink, stay tuned!